Replacing the Octagon Deck
After working on the front yard, we decided to rebuild the two back decks, since the outer edges of the boards were rotted. The framing was fine, it was just the decking that was bad. So I started with the smaller of the two decks, which was the hex. For safety reasons, I only tore out a couple boards ahead of what I needed.

One of the problems was the pergola. Since the legs were bolted to the rail and floor, it was a bit tough getting the new boards under the pergola posts. In addition, I ground out the screw heads that I couldn't get out.

Replacing the Octagon Deck
Replacing the Octagon Deck

Once I hit the center, it went much faster, as I didn't have to cut the ends at an angle. Marie wouldn't let me screw them down completely until I was finished, in case they had to be removed. This allowed the boards to shrink later on as they dried.
Replacing the Octagon Deck

What I didn't know at the time was that I should have put down an underlayment between the decking and the main joists to reduce joist rot. I found this out later when working on the main deck.
The decking is all done, and you can see the edges of each board have all lined up nicely. But this wouldn't last after they shrunk! Now it's time for the railings to be replaced.

Replacing the Octagon Deck
Since the pergola was supported by the railing posts, I decided to replace them one at a time. As you can see here, the base of each post was pretty rotted.

Replacing the Octagon Deck
Replacing the Octagon Deck
I put in the second angled piece and started on the one in between, which did not have angled ends. I also had to remove the braces that held the pergola to the old railings.

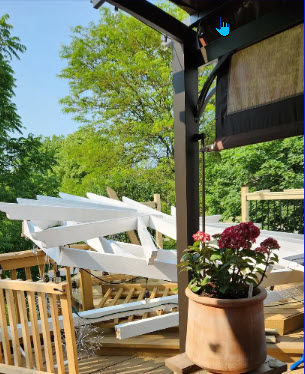
After removing the last segment of the railing, I left to go to Menards for more hardware. When I returned, I found this! All that hard work in building the pergola was gone! But on a side note, the roof stayed in one piece, indicating it was built strong!
Replacing the Octagon Deck
Replacing the Octagon Deck
After clearing the debris, I finished installing the railings. However, if you look closely at the rails, the tops are all lined up, but some of the bottoms aren't, so I had to rework some of them until they all lined up correctly.

Replacing the Octagon Deck

After releveling all the railings, it was time to apply the stain. We used a semi-transparent hybrid stain that was water-based in order to comply with the Illinois EPA laws.
Replacing the Octagon Deck
I just used a brush instead of a roller to ensure I stained the sides of each board. But I'm not really happy with the results. The result looks pretty blotchy to me.


Replacing the Octagon Deck
For the exterior, we used the same color stain, but a solid base, so yeah, same as paint.
Replacing the Octagon Deck

With the deck stained, I started staining the railings white. To save time masking off everything, I just took each segment apart and stained them individually, then put them back together. And as you can see, I had to pause for the rain.
Replacing the Octagon Deck
All finished with the upper octagonal deck!

Replacing the Back Deck Stairs
After we finished the octagon, we noticed that the staircase's outer stringer was also rotting. I immediately began removing the treads and risers, thinking this would be an easy job. But after purchasing a replacement, I realized the original stringers were nonstandard, meaning I had to replace the entire set!


I needed muscle for this job, so I hired a contractor buddy who came out later that day and together, we replaced the staircase. Of course, we had to take the railing out too, but we put that back in temporarily until I had time to put in the new railing that matched the octagon.
Replacing the Back Deck Stairs
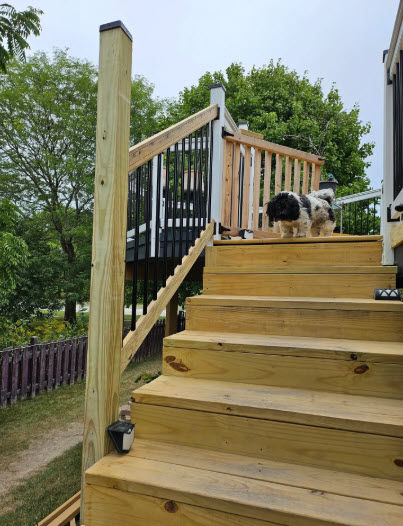
Once again, we bought kits, but this time they were for stairs. I had to do this pretty fast, as the dogs were afraid to walk down the stairs without the railing.
Replacing the Back Deck Stairs

The issue this time was the base. Local code required the bottom post and landing to be set in concrete, but the concrete was only 1" thick!
Replacing the Back Deck Stairs
Marie and I poured a ring of concrete for the post and a slab for the base under the steps, so the bottom step sat firmly on the slab.

Replacing the Back Deck Stairs
Now the steps and railing are finished and ready for staining next year, after the treated wood dries properly. Time for the main deck rebuild!

Replacing the Back Deck Stairs
Replacing the Rectangular Deck

Since I hired my contractor buddy to do the main deck because of the overall size, I don't have many pictures. But here is one that shows the extent of the rot that was going on. This deck was 20 years old and was probably not maintained very well.
Replacing the Rectangular Deck

But here's a shot of the completed deck. It took a couple of weeks of evenings to get it done. I will stain it next year with the solid dark grey stain we previously used.
Replacing the Rectangular Deck

The step was the last piece he completed. It looks really nice.
With the new decking installed, I replaced the railings around it to match the new railing installed around the octagon deck.

Replacing the Rectangular Deck
Replacing the Rectangular Deck

The last thing I did was to build a gate so we could block the dogs from going down to the yard. These guys were digging under the fence to get out, so we wanted a way to restrict their access to the yard. This gate was a temporary solution and I would redo it next year.
Enclosing the Underside
Since the space beneath the rectangular deck was full of junk, we decided to close it off with white vinyl lattice.
For the support posts, I reused the posts from the collapsed pergola.
I began by mounting the first post to the deck beams just under four feet from the end on one side, then digging a hole about 12 inches below it and pouring concrete into a cylindrical form.

Enclosing the Underside

I repeated the process, adding additional posts every 4 feet from the center of each post, since the vinyl lattice segments were 4x8 feet.
I wanted a door on both sides, so those segments were only 3 feet apart.
Enclosing the Underside

With the one side framed, I first tried using a staple gun to attach the lattice, but the staples either went through the lattice, or stuck out—I couldn't seem to find the right pressure setting. So I just used white finishing nails.
Enclosing the Underside

After nailing down the other section, I built the frame for the door.
Enclosing the Underside

Then I moved to the other side and did the same thing, leaving the end piece for another door
Enclosing the Underside

I added trim pieces to hide all seams, so here is the East wall finished.
Enclosing the Underside

And here is the North side that is under the steps.
Enclosing the Underside

And the last side. You can see the door.
Lake Villa Improvements Year 4 (2023)
Replacing the Garden Wall

2023 started with replacing the right side of the front main garden. Since we were going to tear down the right side, we decided to make it wider so we could get in more plants. So the first thing was to figure out how wide we wanted it. As you can see here, I tore out the corner and blocked it in, but we decided that this was too narrow.
So I widened it to match the rope guide, and that was where we decided to start! It's slow moving, since I not only had to dig the trench for the blocks, I also had to dig out all the grass between the blocks and the garden!

Replacing the Garden Wall
I used the same stair stepped design, and tried to match the segments as much as possible with those on the left side.

Replacing the Garden Wall
After finishing a segment, I went back to the previous segment and fill in the gap with the dirt I had dug up, after shaking out the grass roots.

Replacing the Garden Wall
Replacing the Garden Wall

I had not gone very far when I ran into a problem. These two concrete blocks were actually one block that was buried in my path. I tried to dig it up, but it was too big, so I cut it in half with my circular saw and a concrete cutting blade.

From this angle, you can see how much wider the garden became.
Replacing the Garden Wall
Slide 1
To make the bend, instead of curves, I used hard angles and cut the blocks to the angles I used.

Replacing the Garden Wall

Here is the completed wall, up to the corner of the house.
Replacing the Garden Wall

I continued the work, again using hard corners, to go around the side of the house. I wanted to go down the entire length of the house, but Marie wanted me to stop just beyond the gas meter. We had to call the utility companies to come out and mark their lines and confirm they were at least 18" deep.
Replacing the Garden Wall
Replacing the Garden Wall
One last section and I'm done! But again, there's a lot of grass that has to be dug out.


And I'm done with this project!
Replacing the Garden Wall